20 July 2011
This month I’ve had some fun making little web applications to celebrate the birthdays of friends and family. I think I’m going to make a habit of doing this – I’m always looking for an excuse to play around with jQuery, and people seem to get a kick out of them. Click on the images to check them out.
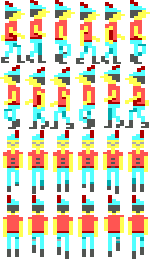
###Lisa’s Quest
As kids, my sister and I spent countless hours playing kings quest. I thought it would be fun to recreate the first scene from KQI to send a unique birthday message.

All graphics were grabbed from the game manually, and the everything is rendered as DOM ndoes. Sprites were used for the parts that are animated.
###Like a Day for Simmy
I’ve got a friend that is notorious for “liking” just about everything that people post on facebook. So to repay her generosity, I made a page that gives her a thumbs up for every day that she’s been alive.

If you hover over any given “like” icon, it will show what day it represents. Likes that fell on her birthdays are highlighted in red. This turned out to be a pretty cool visualization of how many days any given 20-something year old has been alive (there really are LOTS of days).
In retrospect, I should have rendered the little hands in a canves element instead of appending nodes to the DOM. That way this page wouldn’t eat up nearly as much memory.
###iBradley.com Post-it-notified
In an act of general silliness at my last job, some coworkers completely covered our marketing director’s office in post it notes when he was away on a business trip. On his birthday, I decided to recreate that event on a copy of his personal website.

His website seemed particlarly well suited for this kind of vandalism.
27 February 2011
I recently came up with an excuse to work with some large data sets in my spare time. I’ll write more about that project in future posts, but today I wanted to share some quick-and-dirty visualizations of a weather data set that I downloaded from the NCDC while working on that project. After downloading 5 years (and 5 gigs) of weather data, I wanted to get an idea of how complete the data was before I did anything else with it. So I plotted the temperature and average weekly precipitation levels onto a map and animated it. Below is the result:


Each pixel approximately represents a station that collects weather data. The little dancing arrow above the legend represents the average across all data points. This doesn’t really have any meaning outside of this data set, since it is obviously skewed heavily to US and European data (where there are the most data points).
I was pleasantly surprised at the overall quality of the data… I didn’t have high hopes for coverage outside of the United States, but it looks like the rest of the world is well enough covered for my purposes. And for the most part the data looks to be sane.
In case you were wondering, these images were generated using fairly vanilla Java code and mysql queries, along with the help of a nice little map projection library.
29 January 2011
Sometime around Thanksgiving this past year, my brother asked me to help him add some special lighting effects to the party that he was DJing down in New York on New Years Eve.
Traditionally, a party of that size may use a set of automated, standalone light that automatically move/rotate/flash in synch with the music. Its not a bad effect, but he wanted something could he could also pre-program and queue during the show. Unfortunately, the next step up would involve expensive DMX controllers and lights intended to be used in clubs or larger music venues. Those were well out of his price range, so he asked me to put something together that provided more control than the stand-alone option, but was substantially less expensive than the commercial-level options.
Turns out I’ve been looking for a hands-on electronics project. I’ve always enjoyed web programming, mainly because it enabled me to reach a massive audience almost immediately. But I’ve also really like the idea of building software that has real-world effects, and where the interfaces is not just a traditional screen. I’ve been following the DIY community, which has really exploded recently due to the dropping prices of the components needed to put things together. This seemed like a good opportunity to get into this community.
Given the short time-frame, I think it turned out pretty well:

The overall system is pretty straightforward. The computer acts as the controller, and provides a user interface to the DJ. The DJ can trigger trigger light patterns to play or manually turn individual lights on/off through this user interface. The computer is connected to a relay, which controls the flow of electricity standard AC outlets. The lights (or theoretically any appliance that draws less than 5amps) can be plugged into these outlets.
Since I hadn’t built electronics since undergrad, I chose to keep the hardware portion of this project as simple as humanly possible. That led me to choose a design that used a parallel port relay kit to control the lights. That limits the number of channels I could use to 8, and it also meant that the lights could only be switched on/off (no dimming). And it limited us to using a computer that actually still has a parallel port. I found a pretty good example of somebody that was doing something similar, which I ended up mimicking pretty closely.

I’m glad I went through the trouble of assembling the kit myself. Besides costing half as much, I got pretty good at soldering, which came in very handy when my TV broke a few weeks later.
The software portion of the project was a little more tricky than I originally had anticipated. The original concept was to connect the soundboard to the computer, which would then synchronize the current programmed pattern with the music. I simply didn’t have time to learn enough theory and the necessary audio interfaces in the few hours I had to dedicated to this project to do this. So instead, the interface would allow the DJ to trigger a set of patterns by keystroke, which could be overlayed on top of each other if desired. Then on top of the playing patterns, the DJ can turn individual lights on/off.
As a side note, I chose to program this in python, because I haven’t had an opportunity to use it yet.

The top row of lights show the lights that are on through manual control, while the bottom row of lights show the lights being played in the current pattern. You can download the source at on github. Of course, use at your own risk.
There is definitely a lot of room for improvement in this application. If I spend more time improving it I’d probably work on the following:
- Use USB or wireless instead of parallel port
- Add feature detection of current playing music to synchronize music with lighting
- Add the ability to dim lights, instead of simply turning them on/off
- Add more than 8 channels
15 January 2011
 Last month my Samsung Rear projection TV decided to upgrade itself to 3D. Or at least it appeared to.
But alas, that wasn’t the case. Unfortunately for me the convergence chips broke, which was the source of that red ghosting effect. As it turns out, the problem is fairly common among rear projection TVs.
I had a couple of options:
- Buy a new one
- Get it repaired
- Repair it myself
I’ve had this TV since 2003, so I definitely have gotten my money’s worth out of it. But the 1080i picture still is pretty solid, and a replacement LCD or Plasma of the same size (55 inches) would have been very expensive. And getting it repaired probably would have cost more money than it was worth. So I figured I’d try to salvage it by repairing myself.
 After some research, I settled on a repair kit from the aptly named site tvrepairkit.com. For $80 I got all the necessary parts I needed to make the fix. I won’t get into the details, as there are plenty of tutorials out there. But the general process was as you’d expect: I had to take out the board with the broken chips, desolder the broken chips, solder in the new chips, and reconnect the board.
My general takeaways from the experience:
- TVs are DANGEROUS. They have massive capacitors that store enough electricity to deliver a lethal shock, even after the TV is unplugged. Don’t even think about opening one up unless you understand the dangers and take appropriate safety precautions.
- I'm very glad I took pictures of the boards before I unplugged the 30+ wires. I strongly recommend you do the same.
- It wasn’t that hard, as long as you are comfortable soldering/desoldering.
- It was very tedious. It took me about 5 hours on a Sunday afternoon to perform the whole process. Unfortunately I couldn’t physically remove the board from the back of my TV, so I spent the whole time in a hunched position.
- It was definitely worth the effort.


To be honest, I'm not exactly confident that my repairs will last more than a year or two. Either way, I’m glad I did it.
05 January 2011
I'm back!
It's been awhile, perhaps 14 years or so, since I took down my last “personal home page.” I was a fairly early contributor to the web — I built my first home page in 1994, give or take. It went through 3 iterations over the next 3 years, until I took it down in 1997 when I went off to school. Sadly, the wayback machine did not do a very good job of archiving that site, and its contents are forever lost. Sure, it was short on substance (I focused on another website that I was running at the time), but the design wasn’t bad. And it had a pretty awesome animated 3d GIF that I made myself.
Since then my personal web presence has been confined mainly to a couple of private networks. I’ve decided to change that this year, and get back to publishing out to the public web. I have a couple of motivations for doing so, but mainly I’d just like to do a better job of recording my projects, trips, etc for posterity. And maybe somebody will find something here useful one day.
Instead of aggregating all content in one place, I’m just going to link off to existing services for now. In the short term, that means I’ll try to do a better job of posting links & bite-size thoughts onto everybody’s favorite microblogging service. I’ll use this blog as a way to write up some of the projects that I have been doing in my spare time. And I’ll also start putting more content into flikr, stack exchange, etc.

Original about.me copycat design
I went with a very simple, one page design for robscanlon.com that is intended to quickly link people off to appropriate sites. I originally used the about.me format (pictured to the right), but decided to be slightly more original (and simplistic) in the end. Keeping with the the general theme of disconnected services, I chose to keep my blog theme simple and completely unrelated to the main page.
I’m not sure how long the current design will last — I tend to like to change site designs often. But its as good a place as any to (re)start.
And so ends my inaugural post. Hopefully it will be followed by many more!
Cheers,
Rob


